Each drive partition present on your computer has its own Recycle Bin. It is hidden and is considered a protected system folder. You can only view it if you enable the option to graphically see the system files on your computer. Now there are two ways through which you can reset the Recycle Bin; either through an elevated command prompt or graphically deleting it using file explorer.
Solution 1: Using Elevated Command Prompt
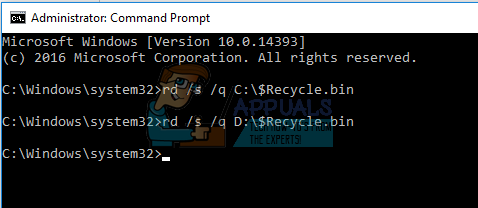
We will use a command using an elevated command prompt to reset the Recycle Bin folder present on each of your hard drives. Do note that you require administrator access to follow this solution and you would have to carry out the task for each drive partitions. Also, be careful when executing the command as you can accidentally delete important system files on your computer. After you execute the command, the Recycle Bin folder and all the files present will be deleted. When you restart your computer, Windows will automatically create new Recycle Bins for you to use. rd /s /q C:$Recycle.bin
Solution 2: Using Graphical Interface
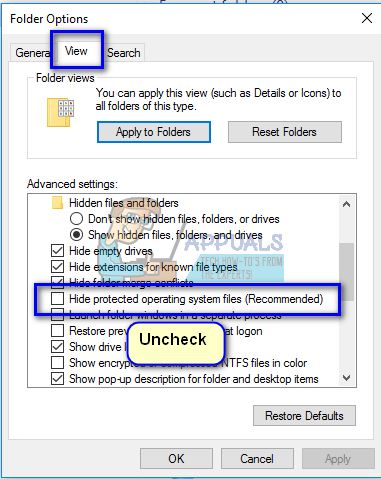
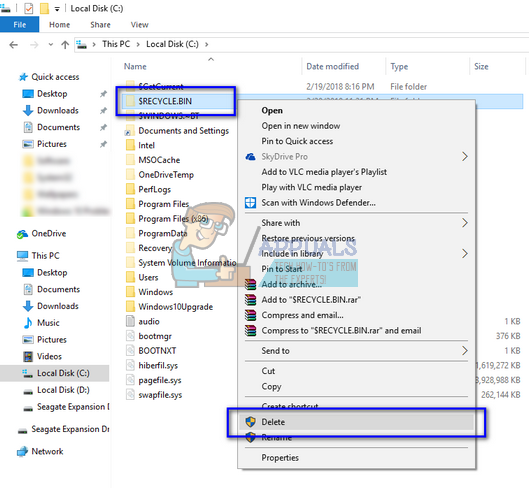
Another method to reset the Recycle Bin is using the Windows Explorer to manually delete all the items present in each partition. Do note that you will still require administrative privileges to perform this solution. First, we will change the properties of the File Explorer so we can see different system files on your computer (Recycle Bins on each drive are considered system files).
Note: If you unable to perform the above tasks in normal mode or if the method is unsuccessful, try booting your computer into Safe Mode. You read our article which guides you step by step on how to boot your computer into Safe Mode.
Fix: Can’t Empty Recycle Bin on Windows 10 after Creators UpdateHow to Change the Recycle Bin Icon on Windows 7, 8, 8.1 and 10How to Change Recycle Bin IconHow to Recover Files Deleted from Recycle Bin in Windows?


