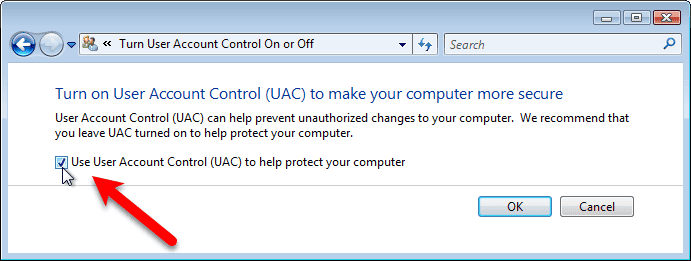
The UAC dialog box displays when you perform actions on your computer. These can be things such as installing or uninstalling applications or drivers, or changing system-wide settings. To continue performing the desired action, you must either provide the administrator account credentials or click a button to continue with the action. If permission is not granted, the action is cancelled.
Why Was User Account Control Added To Windows?
In Windows XP, most people used an administrator account to log into their PCs. All applications had full, unrestricted access to the entire PC. If you unknowingly ran a malicious program, that program would have full access to your system and would be able to infect system files. So Microsoft added User Account Control to Windows Vista to prevent unauthorized changes. When you logged into an administrator-level user account, instead of the built-in administrator account, the explorer.exe process and applications ran with limited user permissions. Programs that needed elevated administrator permissions would ask for them using the User Account Control prompt. You could allow or deny administrator permission to a program with a single click. The User Account Control prompt displayed on a darkened, restricted desktop that programs could not interact with.
UAC In Vista
The feature didn’t work very well in Vista. Applications that were installed in XP were used to having full permissions to access and make changes to the system as they ran. They were not designed yet to run with limited permissions and to constantly request UAC permissions. In Windows Vista, there was no way to adjust the level of User Account Control permissions. You could only turn UAC on or off, and turning it off defeated the whole purpose of UAC in the first place.
In Windows 7, Microsoft added the ability to adjust the level of UAC security, and programs were also designed to work better. Once you set up your system, installed and set up your favorite programs in Windows 7, 8, and 10, you should not see the User Account Control prompt very often.
UAC Improved
In recent versions of Windows (7, 8, and 10), applications run without administrative permissions by default. They have the same permissions as a normal user account and can’t make any changes to Windows, its system files or registry settings. Applications also can’t make any changes to any other user accounts on the system, unless you specifically allow them to. Some applications will ask if you want to install the application for all users or just you, the current user. If you choose to install the application only for you, it will only be able to change its own files and registry settings in your user account only. When you initially install an application or when an installed application wants to make a change to system files or folders, the User Account Control prompt displays and you have to give the application permission to make the changes.
If you’re logged into a standard user account, you may be asked to enter the password from the built-in administrator account to give elevated permissions.
When enabled, User Account Control will inform you of attempts to make changes to your system. If you do not recognize the publisher listed on the UAC prompt, and you did not initiate the change, do not give permission on the UAC prompt. We absolutely DO NOT recommend disabling UAC. It was added to Windows to help protect your system from unauthorized access and changes. You should leave it enabled.
Open User Account Control Settings
Opening the User Account Control settings is most easily accessed by searching for “uac“. Here’s how to open the User Account Control settings in Windows 10, 8, and 7.
Windows 10
In Windows 10, click either the “Cortana” or the “Search” button on the Taskbar and type “uac” in the box. Click on “Change User Account Control settings” in the list of results.
Windows 8/8.1
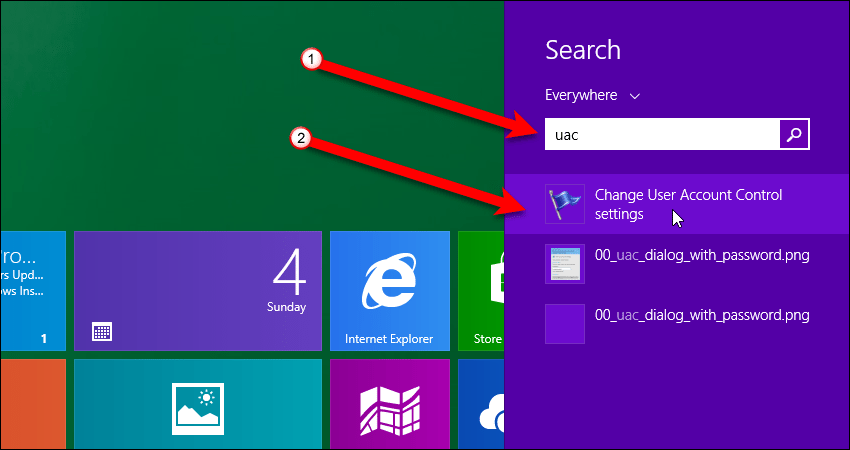
On the Start screen in Windows 8, or 8.1, start typing “uac“. The Search box automatically populates with your search term and results start displaying. Click on “Change User Account Control settings” in the list of results.
Windows 7
In Windows 7, the User Account Control settings are changed in the “Control Panel“. Click the “Start” button and type “uac” into the Search box on the Start menu. Click the “Change User Account Control settings” link under “Control Panel“.
Change User Account Control Settings In PC Settings Or Control Panel
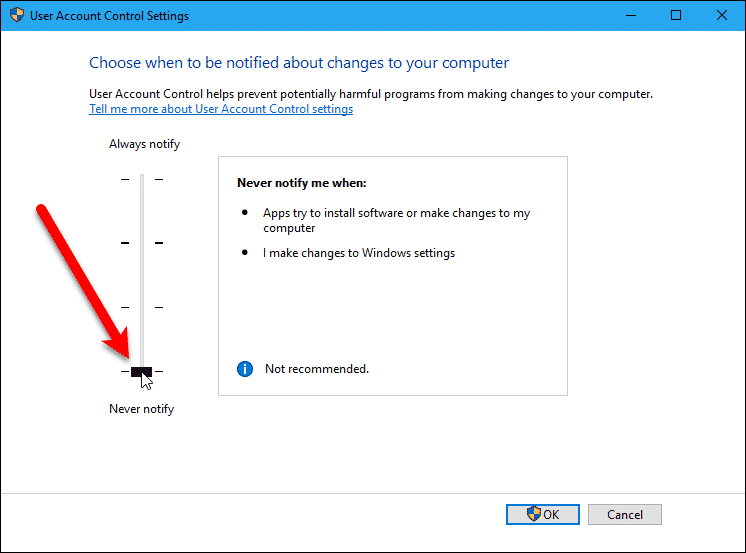
The “User Account Control Settings” dialog box is the same in “PC Settings” (Windows 8 and 10) and the “Control Panel” (Windows 7). The four levels of UAC security are indicated by ticks on either side of the slider bar. Move the slider on the bar to the top for the highest level of security and to the bottom to disable it. As we’ve said before, we do not recommend disabling it.
Always Notify
“Always Notify” is the most secure UAC level, and can be the most annoying. Every time an application or a user tries to make system-wide changes to Windows settings, the UAC prompt displays. You must click “Yes” or “No” on the UAC prompt before doing anything else on your computer. If you’re working in a standard user account, you might need to provide the password from the built-in administrator account to grant the elevated privileges. This setting is like the original implementation of User Account Control in Windows Vista. Drag the slider up to the top to select this level of security.
Notify Me Only When Apps Try To Make Changes To My Computer
The next level down is the default setting, and will notify you if any applications try to make changes to your computer. Every time an application tries to make system-wide changes, the UAC prompt displays. You must click “Yes” or “No” on the UAC prompt before doing anything else on your computer. If you’re working in a standard user account, you might need to provide the password from the built-in administrator account to grant elevated privileges. When this level is chosen, you will not see the UAC prompt, if you make changes to Windows settings. This level is less secure because malicious programs can attempt to change your system settings without your knowledge. However, if you take other precautions, such as running an anti-malware program, your system should be safe with this UAC level. Drag the slider up to the second tick from the top to select this level.
Notify Me Only When Apps Try To Make Changes To My Computer (Do Not Dim My Desktop)
This level is the same as the one discussed above, but the desktop is not dimmed, and other programs can interact and interfere with the UAC prompt. If you’re working in a standard user account, you might need to provide the password from the built-in administrator account to grant elevated privileges. This is even less secure than the previous level because malicious applications can also interact and interfere with the UAC prompt and give themselves permission when you don’t want them to. If you want to set User Account Control to this level, make sure you’re running an anti-malware program. Drag the slider up to the second tick from the bottom to select this level.
Never Notify Me
This level completely disables User Account Control and provides no protection against unauthorized changes to your system. This is the most insecure security level. We DO NOT recommend setting this level. If you do not have a good security solution (anti-malware, anti-exploit, etc.), it’s very likely you’ll have security issues with your system. Malicious programs can gain access to your system and make changes without your knowledge, infecting your system and possibly even taking control of it. Even if you do have a good security solution in place, User Account Control can provide another level of security. No single security solution can provide complete protection. You can never be too careful. If you feel you must select this level, drag the slider down to the bottom.
Change User Account Control Settings In The Registry
In the Home version of Windows, you may not be able to change the User Account Control settings in the “PC Settings” or the “Control Panel“. However, there is a way to change the UAC security settings using the registry. There are several registry keys related to UAC settings and we’ll show you where they are and how to set them.Using the registry also provides more granular control over the User Account Control settings. NOTE: You must be signed into an administrator-level user account to change the User Account Control values in the registry.
Open The Registry Editor
To open the Registry Editor, press the “Windows key+R” to open the “Run” dialog box. Type “regedit” (without the quotes) in the “Open” box and click “OK“, or press “Enter“.
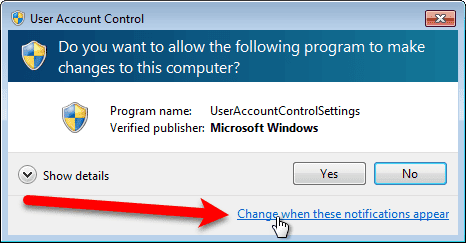
Depending on your current settings, you may see a UAC prompt. If so, click “Yes” to give permission to open the Registry Editor.
Navigate To The Key Containing Values For User Account Control Settings
In the Registry Editor, use the left sidebar to navigate to the following key:
Create a New Key Or Value In The Registry
Before we show you which keys you can change to set the level of UAC security, here’s how to add a new key and a new value to the registry. The key and most of the values we discuss here should already exist in the registry. However, if they don’t, you can add them. This “System” key mentioned in the previous section is the key that contains all the values related to User Account Control. It should already exist, but if it doesn’t, right-click on the “Policies” key and go to “New” > “Key“. Then, type “System” as the name of the key. NOTE: If the “System” key doesn’t already exist, you’ll not only need to create it, but you’ll also have to create the values we’re going to discuss in the following sections. However, you will most likely find that the full key already exists in the registry.
To add a value to the “System” key, right-click on “System” and go to “New” > “DWORD (32-bit) Value“. Name the value as needed. We’ll discuss the names of the values you can change to set the security level for User Account Control in the following sections.
Change The User Account Control Behavior For Administrator-Level Users
To change the User Account Control security level for an administrator-level account (not the built-in administrator account), change the “ConsentPromptBehaviorAdmin” value. The following options are available for the “ConsentPromptBehaviorAdmin” value. 0 – Elevate without displaying the UAC prompt. This allows applications and users to make system-wide changes without requiring consent or the administrator username and password. 1 – Prompt for credentials on the secure desktop. When an operation requires elevated privileges, you are prompted on the secure (dimmed) desktop to enter the username and password for an administrator-level user.
2 – Prompt for consent on the secure desktop. When an operation requires elevated privileges, you are prompted on the secure (dimmed) desktop to select either “Yes” to allow the action or “No” to deny it.
3 – Prompt for credentials. When an operation requires elevated privileges, you are prompted to enter the username and password for an administrator-level user. This is the same as the “1” option but the desktop is not secure (not dimmed). 4 – Prompt for consent. When an operation requires elevated privileges, you are prompted to select either “Yes” to allow the action or “No” to deny it. This is the same as the “2” option but the desktop is not secure (not dimmed). 5 – Prompt for consent for non-Microsoft applications. This is the default value. When an operation for a non-Microsoft application requires elevated privileges, you are prompted on the secure (dimmed) desktop to either click “Yes” to allow the action or “No” to deny it. NOTE: Sometimes you may see that the Publisher is Unknown, even when you know which application is trying to make the change.
To change the “ConsentPromptBehaviorAdmin” value, double-click on the “ConsentPromptBehaviorAdmin” value. Then type one of the above number options in the “Value data” box and click “OK“.
Change The User Account Control Behavior For Standard Users
To change the User Account Control security level for a standard user account, change the “ConsentPromptBehaviorUser” value. The following options are available for the “ConsentPromptBehaviorUser” value. 0 – Automatically deny requests for elevated privileges. This setting is useful for preventing standard users from installing software on a computer or changing settings that require elevated privileges.
1 – Prompt for credentials on the secure desktop. When an operation requires elevated privileges, you are prompted on the secure (dimmed) desktop to enter the user name and password for an administrator-level user.
3 – Prompt for credentials. This is the default option. When an operation requires elevated privileges, you are prompted to enter the user name and password for an administrator-level user. This is the same as the “1” option but the desktop is not secure (not dimmed). To change the “ConsentPromptBehaviorUser” value, double-click on the “ConsentPromptBehaviorUser” value to edit it. Type one of the above number options in the “Value data” box and click “OK“.
Choose Whether The Desktop Dims When The UAC Prompt Displays
The “PromptOnSecureDesktop” value allows you to choose whether the UAC prompt displays on an inactive, secure (dimmed) desktop or an interactive, normal desktop. The following options are available for the “PromptOnSecureDesktop” value. 1 – Enabled. This is the default option. The UAC prompt displays on the secure (dimmed) desktop regardless of prompt behavior settings for administrators and standard users. This overrides the “3” and “4” options for the “ConsentPromptBehaviorAdmin” value and the “3” option for the “ConsentPromptBehaviorUser” value, all of which normally do not display the UAC prompt on a secure desktop. 0 – Disabled. The secure desktop settings for the “ConsentPromptBehaviorAdmin” value and the “ConsentPromptBehaviorUser” value are used. To change the “PromptOnSecureDesktop” value, double-click on the “PromptOnSecureDesktop” value to edit it. Type one of the above number options in the “Value data” box and click “OK“.
Enable Or Disable User Account Control For All Administrator-Level Accounts
The “EnableLUA” value allows you to enable Admin Approval Mode. This means the UAC prompt displays for all administrator-level user accounts, not including the built-in administrator account. The following options are available for the “EnableLUA” value. 1 – Enabled. Admin Approval Mode is enabled. This is the default option. Be sure you set the “ConsentPromptBehaviorAdmin” value to control the UAC behavior and enable or disable the “PromptOnSecureDesktop” value as you want. 0 – Disabled. Admin Approval Mode and all related UAC policy settings are disabled. To change the “EnableLUA” value, double-click on the “EnableLUA” value to edit it. Type one of the above number options in the “Value data” box and click “OK“.
If you enter “0” for the “EnableLUA” value, disabling the UAC prompt for administrator-level users, you must restart your PC for the change to take effect.
Enable UAC For The Built-In Administrator Account
By default, User Account Control is disabled in the built-in administrator account. You can turn on Admin Approval Mode for the built-in administrator account and display the UAC prompt using the “FilterAdministratorToken” value. NOTE: The “FilterAdministratorToken” value may not be available. If you don’t see it in the right pane when you select the “System” key, create a new value named “FilterAdministratorToken“. This is described in the “Create a New Key Or Value In The Registry” section earlier in this article. The following options are available for the “FilterAdministratorToken” value. 1 – Enabled. The built-in Administrator account uses Admin Approval Mode. When an operation requires elevated privileges, you are prompted to select either “Yes” to allow the action or “No” to deny it. 0 – Disabled. The built-in Administrator account has full administrative privileges without the UAC prompt displaying. To change the “FilterAdministratorToken” value, double-click on the “FilterAdministratorToken” value to edit it. Type one of the above number options in the “Value data” box and click “OK“.
Delete a Value In The Registry
If you decide you don’t want User Account Control enabled in the built-in administrator account, you can either change the “FilterAdministratorToken” value to “0“, or you can delete the value. NOTE: By default, the “FilterAdministratorToken” value didn’t originally exist in our registry. So, it’s safe for us to delete this registry value if we don’t want it enabled anymore. However, we don’t recommend deleting any of the other registry values we discussed in this article. To delete a value, right-click on the value you want to delete and select “Delete” from the pop-up menu.
Click “Yes” on the “Confirm Value Delete” dialog box.
What User Account Control level do you use? Do you find the feature useful or annoying? Let us know in the comments. Δ Contact Us :- trendblog.guest@gmail.com